


Introduction
In this blog post, I will describe how to create a GitLab CI/CD pipeline to automatically deploy our Nodejs function to AWS Lambda.
AWS Lambda is a serverless computing service provided by Amazon Web Services (AWS) that lets you run your code without provisioning or managing servers. It executes your code in response to events and automatically manages the computing resources required by your code, allowing you to focus on your application rather than on infrastructure. You only pay for the compute time that you consume and there are no upfront fees or ongoing costs.
In this example, I'll use the serverless framework to deploy our Nodejs function. Full documentation is available here.
Pre-requisites
It is good for you to have the following knowledge, but not limited to, to better understand the practical example I am about to perform.
Basic knowledge of git commands and remote git repos (in this example, Gitlab).
Basic cloud understanding and application deployment in a cloud environment.
How to use the AWS CLI and configure it using the IAM access key and secret access key credentials.
Abstract
In this section, I will explain the workflow I am trying to implement. First, I'll create a GitLab repository using the serverless framework's built-in template. Then I'll pull that repository and see whether it runs successfully locally. If everything is in order, I will develop a Gitlab CI/CD pipeline to automatically deploy our Node.js application to AWS Lambda.
Bootstrapping a serverless Node.js application
To try along with me in this example, you must first have nodejs and npm installed on your local laptop or desktop. NVM can be used to install, follow this guide if you're unsure how to install it.
First, create a directory for your project.
mkdir gitlab_to_lambdaChange the directory to the project directory and install serverless packages for your node runtime.
 cd gitlab_to_lambda
 npm install serverless -g
After that, use
serverlesscommand to set up a boilerplate for your application and answer the questions prompted interactively. In this example, I used the AWS - Node.js - Express API example.
Now that the Serverless framework has officially offered you a boilerplate repository, you can begin deploying a serverless lambda function from your GitLab CI/CD. Let's review the configuration files for our serverless function now.
Deploy manually
If you've already set up your AWS credentials by using the aws configure command in your terminal, you can manually deploy from your local computer to AWS. Use these steps to deploy your function to AWS:
Change into the project's directory and install dependencies.
 cd <project-dir>
 npm install
Use serverless command to deploy your function to AWS.
serverless deploy --stage dev --verboseThis command automatically builds an AWS cloudformation stack in the region you provide in the serverless.yml file (if not, default region = us-east-1) and this cloudformation stack produces all required AWS resources for your serverless application, such as an apigateway endpoint to call your function, a lambda function, its execution role, a s3 bucket for storing artifact files, etc.
If your command runs correctly, it will produce an endpoint url just like screenshot below.
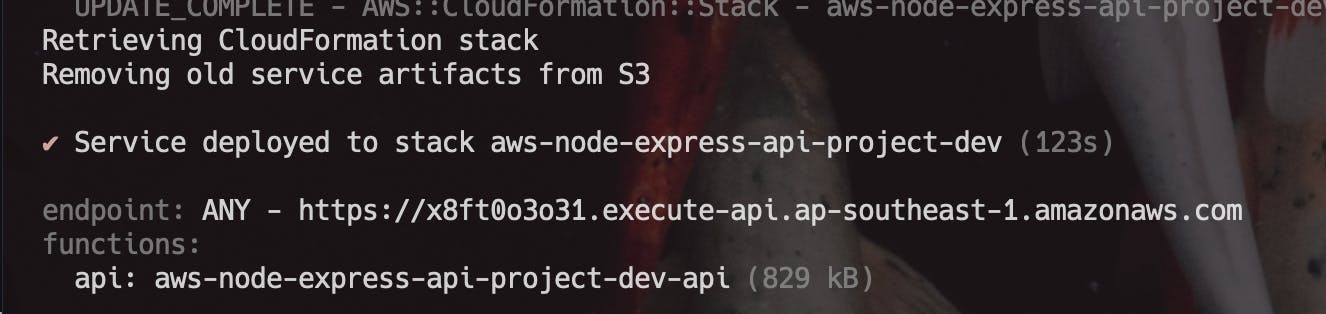
You can check your endpoints' (/) root path or (/path) by visiting the provided url. You'll notice a message of success. Optionally, you can use to test your deploy function by using:
sls invoke --function api
Deploy with Gitlab CICD
To deploy via the GitLab CI/CD pipeline, we must define two environment variables in the Settings -> CICD -> Variables section of our repository.
AWS_ACCESS_KEY_ID
AWS_SECRET_ACCESS_KEY
These values can be generated using the AWS IAM console in your user profile.
IAM -> Users -> (your-username) -> Security Credentials -> Create Access Key button
If you're not sure how to generate these, check out this blog post.
Now, let's look into our .gitlab-ci.yml file for CI/CD configuration.
image: node:latest

stages:
  - deploy

production:
  stage: deploy
  before_script:
    - npm install -g serverless
    - export AWS_ACCESS_KEY_ID=${AWS_ACCESS_KEY_ID}
    - export AWS_SECRET_ACCESS_KEY=${AWS_SECRET_ACCESS_KEY}
  script:
    - serverless deploy --stage dev --verbose
  only:
    - main
The configuration of the CI/CD is very straightforward, consisting simply of one stage and one job. Our AWS credentials variables are exported into the GitLab runner's environment in the before_script section. Next, using the serveless deploy command, we deploy our nodejs application into an AWS Lambda.
Summary
In this post, I've shown you how to set up and use a GitLab CI/CD pipeline to use the serverless framework. This is only the beginning of using serverless in the cloud world; continue to learn as I do. Thank you for taking the time to read this.
Reference
You can reference my public git repository here for code.